Lemony Kale & Cannellini Bean Soup

Is it just me or does everybody seem to be ill right now? Colds, flus, sick bugs…everybody seems to have one! My brother’s got a particularly bad case of tonsillitis right now, so with him in mind, I came up with this flu-fighting soup packed full of all those brilliant vitamins and minerals to help you get back on the mend, or even to protect you from getting the viruses themselves! Even if you’re not ill, this is some great comfort food that will make you feel all warm and fuzzy inside — totally hygge! Oh, and did I mention this dish is 100% vegan and jam packed with protein?

20170203_182713-01.jpeg

Ingredients (Serves 2)

  • 1 400g tin of cannellini beans or 250g of your own pre-soaked cannellini beans
  • 1 bunch of kale
  • 1 stick of celery
  • 1 onion
  • 1 garlic clove
  • 1/2 a lemon
  • 1 tablespoon of olive oil (or any other vegetable oil)
  • 1 litre of vegetable stock
  • Salt & Pepper for seasoning

Method

  1. Heat the olive oil in a pan over a medium heat. Finely slice the onion and celery into half rings, and add them to the pan.
  2. Once the onions and celery have begun to soften up, mince the garlic, then add it to the pan. The garlic must be added later, otherwise it may burn, as it takes a shorter time to cook.
  3. Once the vegetables in the pan have completely softened, remove the thick stems from the kale and then tear the kale into roughly 2-inch pieces. Add the kale to the pan, and give the mixture a stir.
  4. Add the vegetable stock and bring to a boil. Once the soup is boiling, reduce the heat back down to a simmer.
  5. Squeeze the juice of half a lemon into the pan, then give the soup a mix. Season with pepper, and add salt to taste. Be careful though as the stock will already be salty!
  6. Place the lid on the pan and simmer for 3 minutes. Then, add the drained cannellini beans to the mix, and simmer for around 4-5 minutes, or until the kale has softened and been fully cooked through.
  7. Serve into two bowls, and enjoy! Feel free to add your own herbs or vegetables to garnish. For example, you could add some diced avocado or chopped up parsley to make it your own!


Leek & Sweetcorn Wild Rice

Have you ever had those days when you’ve forgotten to go to the supermarket, or you just want to use scraps in the fridge? I certainly have.

I came up with this recipe after a long day at work in which I felt too tired to go shopping but at the same time, also wanted to use up the week’s leftovers. As I didn’t have any meat, I decided to come up with a vegan recipe. Using wild rice as my base, I rummaged around in my fridge and soon found a leftover leek. However, I figured that just some rice and leeks wouldn’t make a particularly substantial meal, so I decided to use a tinned can of sweetcorn as well. In order to boost the flavour of the dish, I chopped up the remaining coriander from the guacamole I’d made the night before. I was so happy with the result, that I’d thought I’d share it with all of you.

wild-rice

Ingredients (Serves 1)

  • 75g (1/2 cup) of basmati with wild rice
  • 1 tbsp of vegetable oil (I used olive oil)
  • 1 garlic clove
  • 375ml of vegetable stock
  • 1/2 of a leek
  • 80g (3 tbsp) of sweetcorn
  • 1 tsp of thyme (Optional)
  • 1 tbsp of chopped coriander (Optional)
  • Salt & pepper for seasoning

Method

  1. Heat the oil in a pan over a medium heat. Chop the leek into slices and then sauté it in the pan. Once the leeks have softened, mince the garlic, then add it to the pan along with the thyme.
  2. Once the leeks have begun to brown slightly, add the rice and fry it with the leeks and garlic for a couple of minutes.
  3. Add the vegetable stock and bring to a boil. Once it has reaching a rolling boil, reduce to a simmer. Cook for around 20 minutes (check the cooking times on your rice packet, as it may differ with each brand).
  4. Once the stock has reduced after around 20-25 minutes, stir in the sweetcorn. Add salt and pepper to taste.
  5. Finish off by garnishing the dish with chopped coriander, and enjoy!

Wholewheat Farfalle with Tomato Sauce & an Egg

Whenever I go to Spain, my grandmother always makes me a traditional Spanish meal called ‘Arroz con tomate’. Every child who has grown up in Spain will know about this and will undoubtedly have eaten it many times after a long day at school. ‘Arroz con tomate’ is simply white Spanish rice, covered in tomato sauce and topped with a fried egg. Using this dish as my inspiration, I decided to create a healthier alternative. I swapped the white rice for wholewheat pasta, in order to bring more fibre and protein to the dish. The use of wholewheat pasta also makes the dish more filling, so you won’t be hungry straight after the meal, and you won’t need to serve yourself huge portions! I kept the tradition of the tomato sauce, but instead of a fried egg, I decided that it would be nice to top the dish with a poached egg. I not only did this because it is a healthier alternative to frying an egg, but I also much prefer the taste and texture of poached eggs.

14487205_1146702935422370_5004566871928733696_n

Ingredients (Serves 1)

  • 80g of dry wholewheat farfalle pasta (Other small pastas like penne or fusilli are a great alternative too)
  • 800ml (3 cups) of water & another 800ml (3 cups) of water
  • 3-4 tbsp’s of tomato sauce
  • 1 egg
  • 1 tbsp of vinegar
  • Salt and pepper for seasoning

Method

  1. Pour 800ml (3 cups) of water into a pan and bring to a boil. Add a pinch of salt, then add the dried pasta. Cook until al dente, which should be around 8-10 minutes (this varies according to the type of pasta you have bought, so I would check the back of your packet).
  2. Once the pasta has cooked, drain the pasta but keep a few tablespoons of the pasta water, as the starchy water will help to bind the tomato sauce to the fusilli.
  3. Heat the tomato sauce in a pan with the remaining pasta water over a low heat. Once it has heated up (or if you can see small bubbles forming), gently fold in the cooked pasta. Once the mixture has combined, you can take it off the heat.
  4. Fill up another pan with the other 800ml (3 cups) of water and the vinegar. Bring to a simmer, then with a spoon, create a ‘vortex’ in the water by mixing the water clockwise. Crack your egg into the water. It should take around 3 minutes for the egg to poach, but you should check every minute by taking the egg out of the pan with a spoon and gently pressing your finger on the yolk to see if it is your desired consistency.
  5. Place your pasta in a serving bowl, then add the poached egg on top. Season with salt and pepper, and enjoy.

Banana & Yogurt Oatmeal

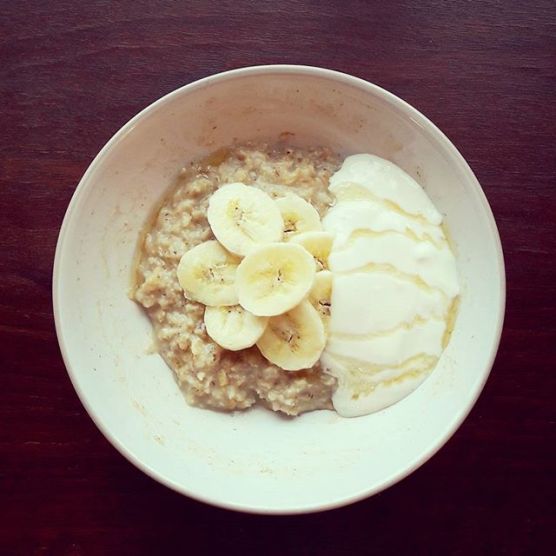
When I was younger, my mum would often make me and my siblings bowls of banana with yogurt and honey for dessert. This inspired me to combine this recipe with oatmeal, as I thought it would make an exciting breakfast option, but also give me an excuse to eat dessert first thing in the morning! The yogurt provides a refreshing contrast to the sweet banana and honey, whilst the banana also enhances the creaminess of the yogurt. Although I love my mum’s traditional recipe, I chose to use agave syrup instead of honey as it provided a more neutral flavour that didn’t overpower the taste of the oats and bananas.

14073364_1733157433571717_1854761662_n

Ingredients (Serves 1)

  • 50g of oats
  • 200ml of almond milk (or another dairy free milk of your choice)
  • 1 banana
  • 2 tbsps of dairy-free yogurt (I used soy yogurt, but coconut yogurt works just as well)
  • 1 tbsp of agave syrup (or another sweetener of your choice, such as honey or maple syrup)

Method

  1. Place the oats and almond milk into a pan and simmer over a medium heat. The mix should be regularly stirred so that the oats don’t stick to the bottom of the pan. Once the mixture has thickened to your preferred consistency (which can take between 5 to 10 minutes depending on your preferences), take the mixture off the heat.
  2. Slice the banana into slices, and then put your oatmeal into a serving bowl.
  3. Top your oatmeal with the banana slices and yogurt, then drizzle with agave syrup. If you prefer your oatmeal cold, then you can place it in the fridge for a few hours before serving.

Mediterranean style scrambled eggs

You say brunch, I say scrambled eggs! Nothing beats scrambled eggs on toast when you’re looking for convenience, nutrition and comfort.

Before I went lactose-free, I used to love the traditional British silky smooth scrambled eggs made with butter, or even sometimes crème fraîche or cream. So when I ditched the dairy, I had this conundrum – how could I make great scrambled eggs without using dairy? The obvious choice would be to use dairy substitutes such as vegetable butter, or soy cream, but I am not a fan of using substitutes as they very rarely taste like the real deal, and I much prefer finding new and improved methods of making my favourite dishes.

However, my problem was solved when I spent a summer in Spain. My grandmother offered me a plate of scrambled eggs. I apologised and said I couldn’t eat them because they would have dairy in them. She looked at me with surprise and told me that in Spain, they very rarely ever used dairy products in their scrambled eggs. Looking at the plate skeptically, I took a bite, and was surprised to find that the eggs tasted creamier and smoother than I was used to despite the absence of dairy products! I begged her to tell me how she made them, and I was shocked to discover that the only real differences were that the eggs were cooked in olive oil and that they were cooked over a low heat for less time, resulting in a silky texture. So now I’m going to show you how you too can make the ultimate batch of scrambled eggs.

13721233_565500053631892_240963250_n

Ingredients

  • 2 large eggs
  • 1tbsp of olive oil
  • Salt & pepper for seasoning
  • 1 slice of wholemeal seeded bread (Optional)

Method

  1. Whilst you wait for your frying pan to warm up to a low heat, whisk both the eggs together in a bowl. Then, if desired, toast your slice of bread.
  2. Add the olive oil to the pan and once it’s gained some heat, add the whisked eggs.
  3. With a spatula or wooden spoon, make circular motions throughout the pan, so that the eggs don’t stick to the bottom and overcook. Keep doing this without stopping so that you can get the smooth finish.
  4. Once the eggs no longer appear to be a liquid and you can see that some parts of the egg are beginning to solidify, take the eggs off the heat.
  5. Make sure not to keep the eggs inside the pan for too long as even if the pan is no longer over the heat the eggs will continue to cook because the pan will still be warm. Quickly scrape the scrambled eggs onto a plate or onto your piece of toast, then season with salt and pepper.

Weetabix with summer berries

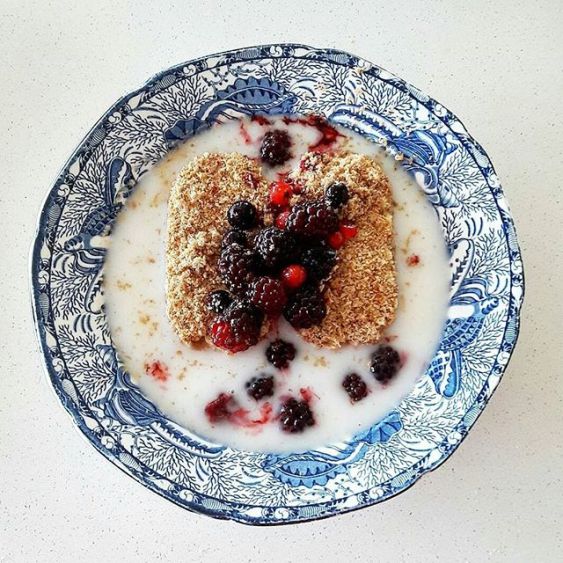
Most days, I like to have oatmeal for breakfast, but if I’ve forgotten to make overnight oats and I don’t have time to make oatmeal from scratch, then cereal is a great alternative. It’s also a lighter option if you aren’t keen on eating something as filling as oatmeal. One of my favourite cereals is weetabix because it’s not only very healthy for you because of its wholegrains, fibre and low fat content, but it can also serve as a blank slate for all your creative cooking ideas. For example, you can top your weetabix with fruits, nuts, yogurt, nut milks, or even eat them like toast by spreading jam or nut butters on them. It can also be a great option if you’re looking for breakfast ideas on a budget. In order to save money, I bought a bag of frozen summer berries and thought that it would make a healthy and tasty topping for my weetabix. However, as berries can be quite tart, I felt that a sweetener needed to be added. I decided to use maple syrup because it’s a great natural alternative to refined sugar, and it compliments the berries very well. I also used coconut milk rather than other nut milks, such as almond milk, as I find it to be thicker and creamier, which helped to enhance, rather than diminish, the flavour of the weetabix.

13774260_169728580105339_584407289_n

Ingredients

  • 2 weetabix (or oatibix) (You can also use another cereal of your choice if you prefer)
  • 150ml of coconut milk
  • 1 handful of summer berries (fresh or frozen)
  • 1tbsp of maple syrup (or another sweetener of your choice)

Method

All you need to do, is put the weetabix in a bowl, add the coconut milk, then the summer berries, and finish by topping your cereal with maple syrup (or another sweetener of your choice). If you are using frozen summer berries, make sure to defrost them before adding them to your cereal.